User manual for apiary GSM scales BH-1, BH-04
The device is intended for collecting physical parameters of beehives and recording them on the web server bee.in.ua. BH-1 measures the current weight of a hive (BH-4 — of four hives), the temperature and relative humidity of the air inside the hive, as well as the air temperature outside. BH-1 and BH-4 devices are not intended to be used as commercial scales. They are designed to monitor trends in the operation and development of bee colonies.
Schematic view of the BH-01, BH-04 device

- Power button
- External power port
- Tare button
- OLED display
- SIM card slot
- ECO mode button
- GSM antenna port
- Weight sensor port 1
- In-hive temperature and humidity sensor port
- External temperature sensor port
- Transparent cover mounting bolts
- Board mounting bolts
- Weight sensor
- In-hive temperature and humidity sensor
- External temperature sensor
- GSM antenna
- Power supply
- Plug for connecting a solar panel
- Weight sensor port 2
- Weight sensor port 3
- Weight sensor port 4
- WiFi–GSM selection jumper
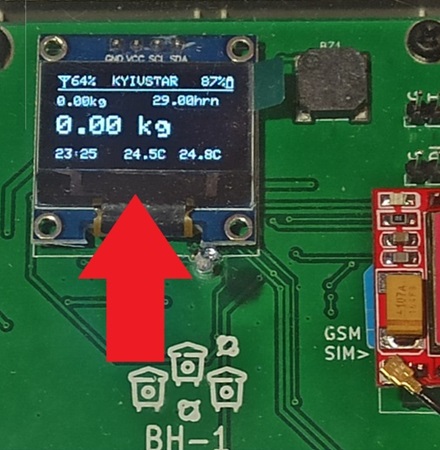
Schematic view of the OLED display
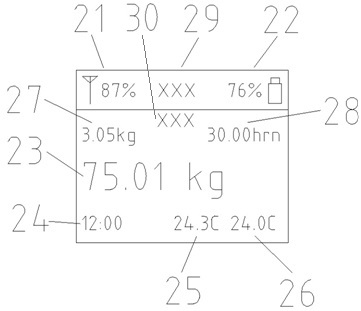
- GSM/WiFi signal level
- Battery charge level
- Current weight value
- Current system time
- Current in-hive temperature
- Current external temperature
- Weight gain since last evening (22:00)
- Balance on the GSM operator’s account
- GSM operator name, WiFi connection status
- IP address in the WiFi network
Connecting the weight sensor (13)
With button (1) switched off, connect the plug(s) of the weight sensor(s) (13) to port(s) (8, 19, 20, 21). It is not necessary to tighten the plug nut. If needed, the device can also operate without the weight sensor(s) (13), for example in winter.
Connecting the temperature and humidity sensor (14)
With button (1) switched off, connect the sensor (14) plug to port (9) and tighten the plug nut clockwise. If needed, the device can also operate without this sensor.
Connecting the external temperature sensor (15)
With button (1) switched off, connect the sensor (15) plug to port (10) and tighten the plug nut clockwise. If needed, the device can also operate without this sensor.
Connecting the GSM antenna (16)
Connect the antenna (16) plug to port (7) and tighten the plug nut clockwise.
Selecting the GSM or WiFi network (22)
The jumper (22) allows you to select either the GSM LTE (4G) or WiFi network for the device operation. WiFi mode allows the device to send collected data to a global server via your WiFi router. In this mode you can also configure the device via the local web dashboard. In GSM LTE (4G) mode, the device operates via mobile internet. In this mode SMS commands and SMS reports also become available.
Turning the device on
Button (6) is not pressed. All required sensors are connected. The battery is charged or the device is being charged from an external power source. Press button (1) and wait for the sound signal and the information to appear on the display. The device is now turned on.
Turning the device off
To turn the device off, switch off the power button (1). The device can be charged even when it is turned off.
Operating modes of the device
Two operating modes are provided: full and ECO. The full mode is used for configuring the device, checking the connection and taring the weight sensors, and ECO mode is for continuous round-the-clock operation. In full mode, the device shows information on the OLED display (4), sends data to the web server every 10 minutes and periodically receives SMS commands. In ECO mode, BH-01 (BH-04) does not show information on the display, periodically switches to sleep mode and wakes up according to the internal timer. After waking up, the device checks SMS commands, sends data to the web server and returns to sleep mode. ECO is an energy-saving mode designed for maximum battery life. You can change the wake-up interval in this mode to the following values: 15 min, 20 min, 30 min, 60 min, 12 h, 24 h. In this case, the wake-up timer counts from 0 minutes of the current hour. For example, when the interval is set to 15 minutes, the device will wake up exactly at XX:00, XX:15, XX:30, XX:45 of every hour.
Initial WiFi setup
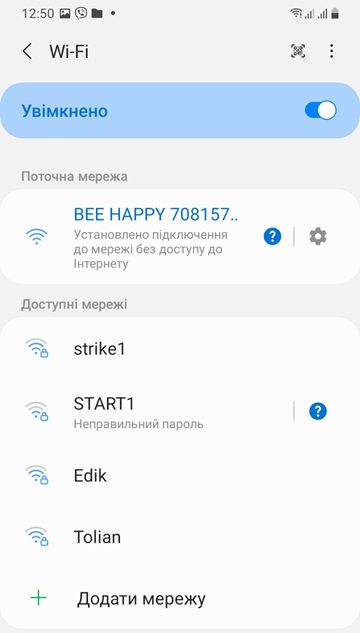
First, the device must be configured to connect to a WiFi network. Switch jumper (22) to the WiFi position. Release the ECO button and press the power button. Connect from a computer, tablet or mobile phone to the WiFi network created by the device. It has no password. The network name will contain the unique ID number of the device.
After a successful connection, open an internet browser and enter the IP address 192.168.4.1 in the address bar.
Login: admin, password: peremoga
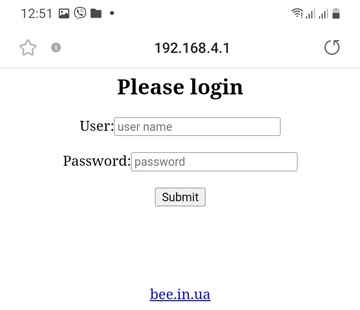
After that, you should be taken to the main page of the device’s web dashboard.
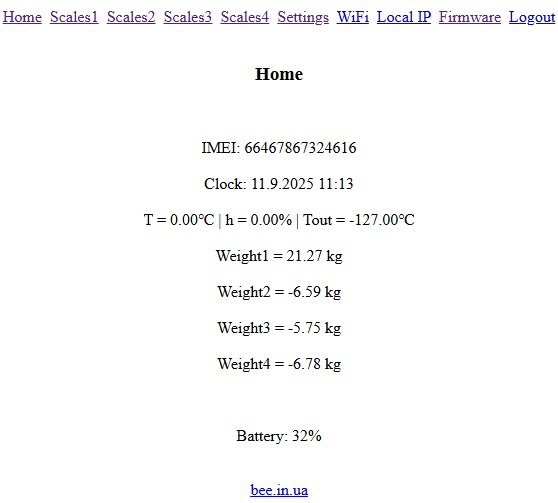
On the main page of the web dashboard you can see the unique device number, internal clock, sensor readings and the charge level of the internal battery.
Now go to the WiFi tab to configure the device for your network. Enter the name and password of your WiFi network here and click the Submit button to save.
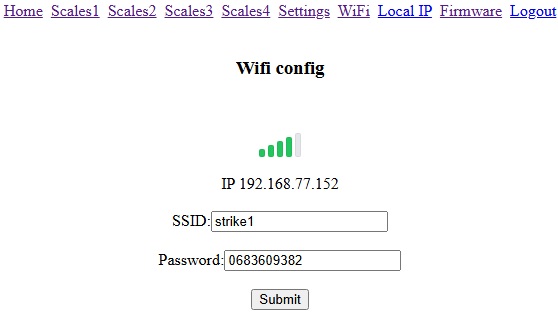
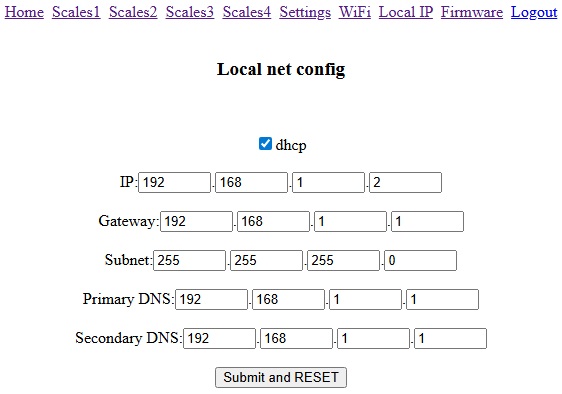
If necessary, you can manually configure the IP of your network and click the Submit and RESET button. The device will reboot.
Connecting to the device’s web dashboard
Now the configuration can be performed through your WiFi network. Connect using a computer, tablet, or mobile phone to your WiFi network. Open an internet browser and enter the IP address displayed on the device screen (30) in the address bar.
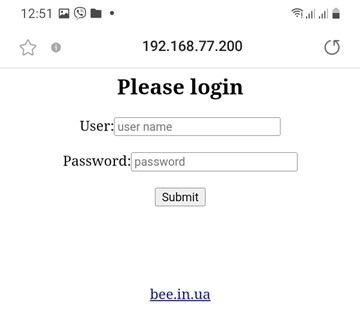
Login: admin, Password: peremoga
After this, you should be taken to the main page of the device’s web dashboard.
Configuring the weight sensors
To configure the weight sensors, go to the link Scales1 (Scales2, Scales3, Scales4).
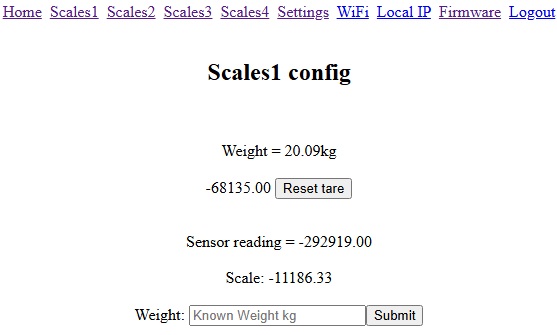
With the scales empty, press the Reset tare button. Wait for the webpage to reload and for the device’s sound signal.
Place a known weight on the scales and enter its value into the lower Weight field, press Submit and wait for the page to reload. Check whether the measured value corresponds to the actual weight.
To tare (reset to zero) the scales, press the Reset tare button and wait for the page to reload and the device’s sound signal. Taring can also be performed using the physical buttons (3) on the device. The scaling and measurements remain correct.
General settings
Go to the Settings tab in the WiFi web dashboard.
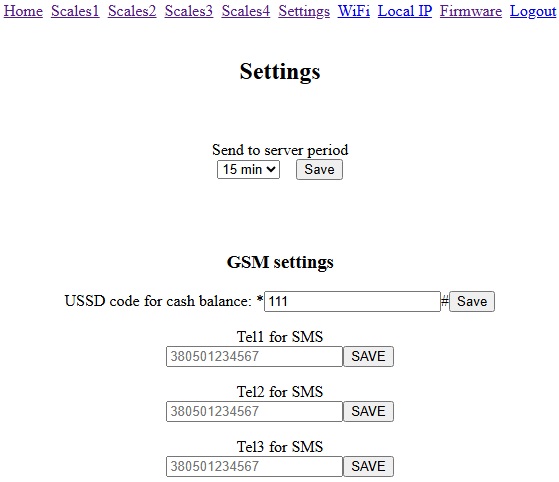
On this page you can configure the following parameters:
1. Device sleep period duration.
2. USSD code of the mobile operator to check the account balance.
3. Three phone numbers for receiving SMS reports. Leave unused fields empty. If you do not want to receive SMS, leave all phone number fields empty.
After changing any parameter, click the corresponding Save button and wait for the webpage to reload.
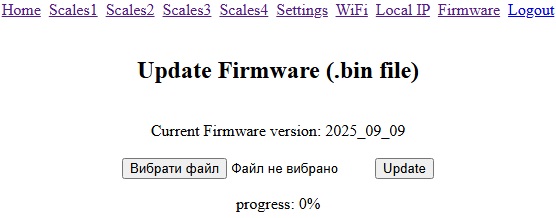
Uploading new firmware
If you have the device firmware file, you can upload it on the Firmware tab (consult with your distributor beforehand).
Scheduled SMS
The device sends three SMS messages daily with the main data to the owner's phone numbers (up to 3 numbers). These SMS messages should arrive at 7:00, 15:00, and 21:00.
You can also view the latest data in the Telegram bot, where it is marked with the tag “On the map”. The bot is called beeinua. After entering the bot, follow the further instructions.
Setting the sleep period in ECO mode
If you need to change the sleep period, send an SMS to the phone number of the device’s SIM card with one of the following commands, which set the period in minutes:
- d1=15
- d1=20
- d1=30
- d1=60
- d1=720
- d1=1440
When the device receives and executes an SMS command, it will emit a sound signal and briefly display the received command text on the screen (4).
You can also configure the sleep period in your personal account on the website or locally in the WiFi web dashboard.
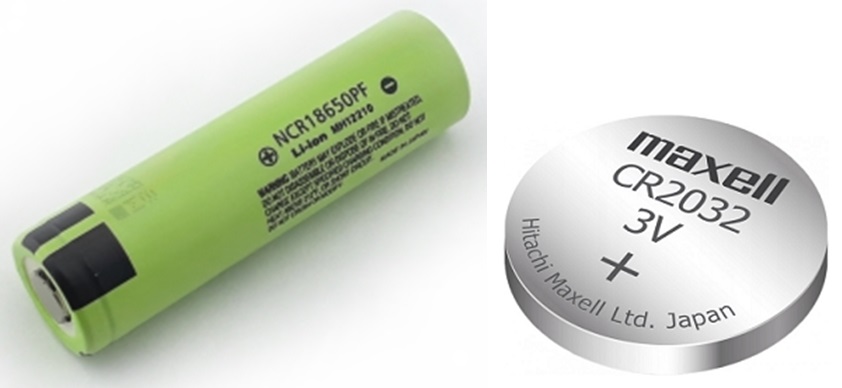
Power supply
Inside the case, the device contains one main lithium-ion battery of size 18650 with a capacity of 2900 mAh 3.7 V, and a small clock lithium-ion battery of size CR2032 3 V for powering the system clock.
To charge these batteries, port (2) is provided, which allows connecting DC power sources with voltage 6…18 V, such as power supplies, lead-acid batteries, solar panels, etc. The device can be charged periodically (2–4 times per month) or continuously, leaving the external power source connected. The charging port (2) is protected against incorrect polarity of the charger.
The charging process occurs regardless of the position of the power button (1), but the device will charge faster when turned off or in ECO mode.
To replace the batteries, remove the upper transparent cover of the device by unscrewing 4 screws. Lift the top board by unscrewing 4 more screws. This will give you access to both batteries.
Installing the BH-1 device in the apiary
1. Before placing the hive on the weighing platform, charge the device to more than 90%, connect the sensors and the antenna, and top up the balance of your GSM operator.
2. With the ECO button (6) switched off, press the power button (1).
3. After a short sound signal, the data will appear on the display.
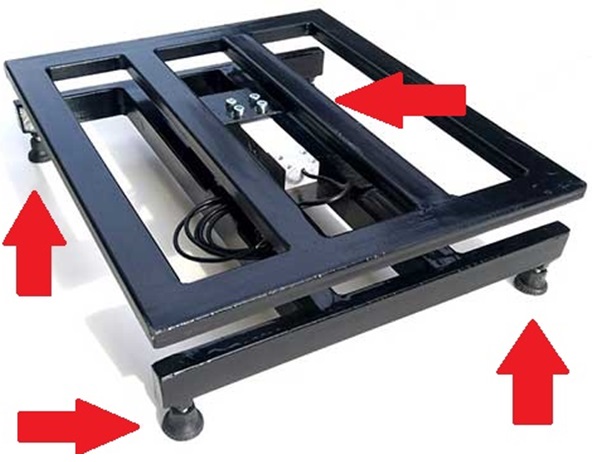
4. Using the adjustable feet, level the weighing platform horizontally.
5. Place the hive on the weighing platform (the hive weight must not exceed 300 kg).
6. Press the tare button (3).
After a short time, a sound signal will be heard and the display will show “0.00 kg”.
7. The display will now show the real-time weight.
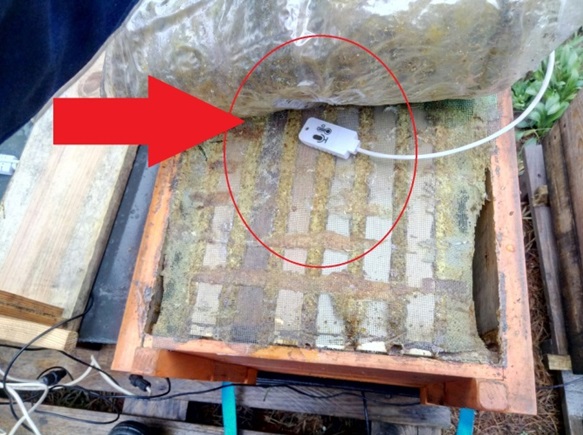
8. Install the internal temperature and humidity sensor through the dividing mosquito net in the center of the brood nest, above the frames.
9. Place the external temperature sensor outside, under a canopy, so that direct sunlight does not reach it.
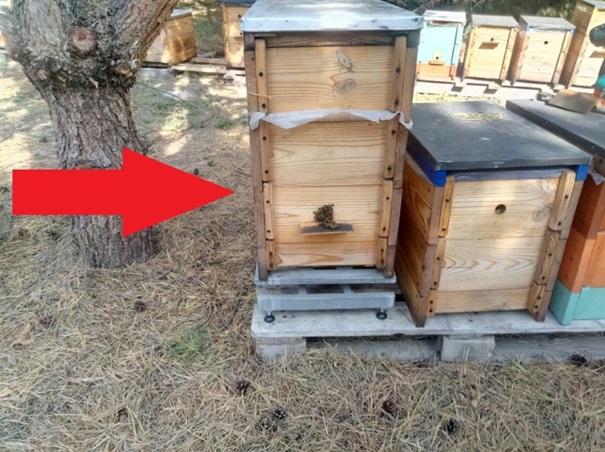
10. Position the BH-1 device above the brood nest of the bee colony, routing the sensor cables through the hive entrance.

11. Press button (6) to switch the device into ECO mode. The screen will turn off, and after transmitting data to the server, the device will enter sleep mode. Exactly at XX:00, XX:15, XX:30, and XX:45 (depending on the settings) each hour, the device will wake up to send data to https://bee.in.ua and SMS to the owner according to the schedule 7:00, 15:00, 21:00. In sleep mode, on a full battery charge, the device will operate for more than 14 days (with 15-minute wake-ups).
12. Close the hive roof and install the antenna.

13. The BH-1 (BH-4) device is ready for operation.
14. Every 10–20 days, the device battery must be recharged. You can charge the device using: a 9–12 V power supply block, a large-capacity 12 V lead-acid battery. The device battery may also remain on continuous charge from a power supply or a 6–12 V (>3 W) solar panel.

You can connect the solar panel directly to the power connector, but if you need to charge a lead-acid battery in parallel, use a solar charge controller. During the winter cloudy months (November, December, January) we recommend leaving the device connected to a fully charged external 12 V >7 Ah lead-acid battery and recharging it when needed.
15. The device data in the form of graphs can be viewed in your personal account on https://bee.in.ua.
Storage of the BH-1 (BH-4) device:
- turn off the device
- disconnect all sensors
- remove the hive from the weighing platform
- place all components into a prepared container (box)
- move them to an indoor storage place
The device must be stored in a dry place at a temperature of +5…20 °C, with all components carefully placed and kept out of reach of children and animals. Before long-term storage, charge the device to 40% and disconnect the power.
Lightning protection
If lightning strikes the antenna, the device may be completely damaged. Therefore, it is recommended, if possible, to install a lightning rod near the hive. This can be a metal conductive rod, higher than the tip of the antenna, placed into the ground.
Possible malfunctions
The device does not wake up in ECO mode after full battery discharge and recharging.
The clock battery CR2032 has failed. Replace this battery with a new one.
Scheduled SMS are not received
The owner's phone number is incorrectly entered in the device settings. Make sure that the correct phone number (380xxxxxxxxx) is entered in the WiFi web dashboard.
Low GSM signal <35%
Antenna malfunction — replace the GSM antenna.
Poor coverage in this location — raise the antenna higher, change the GSM operator, or install a directional GSM antenna.
The device does not turn on
ECO mode is enabled — disable button (6).
The battery is discharged — recharge the battery.
The battery has failed — replace the battery.